On the third Monday of the month a group of enthusiastic knitters meet in the Resource Room at the Duxbury Free Library. From 6:00 - 8:00 you can find knitters of various skill levels with yarn between their fingers. We would love you to join us. If you can't, follow us here!

Friday, December 26, 2014

Mittens . . . Step #4

Okay, are you ready to stuff it?!

The cuff to my mitten is done and I am ready to knit the body of the mitten. My fleece is separated and I'm going to insert a piece into every fourth stitch. So here goes . . . 


I knit 4 stitches . . . then I picked up a strip of the fleece and twisted it . . . 


. . .  I started to knit the stitch, but before I wrapped the yarn around the needle I folded the twisted piece of fleece in half and placed it over the needle.


Then I finished knitting the next stitch. When I wrapped the yarn around the right-hand needle it anchored the fleece in place. 


Here is what it looked like when I slid the stitch off the needle.

See how it's a little loose?


Give it a little tug . . . just make sure you have both ends so that you don't pull it out completely!


Finish working the row and insert a piece of fleece after every fourth stitch. 

Then work four rows, and on the fifth row insert the fleece again. This time instead of knitting four stitches, knit two stitches and insert a piece of fleece . . . then knit four stitches and insert another piece . . . and continue inserting after every fourth stitch. 

Keep working in this method . . . insert fleece after every four rows . . . and stagger between inserting the fleece after the fourth stitch and after the second stitch. This will spread the fleece throughout the mitten.


Here's an inside view of the mitten. Cozy looking , huh? It's pretty puffy looking right now . . . but after they have been worn a few times the fleece will flatten a little and start to felt against the mitten. 


Don't forget to add fleece when you work the thumb!


I used size 3 and 5 needles . . . a little smaller than I would ordinarily use for worsted weight yarn . . . but I wanted them knit at a tighter gauge to keep the fleece in . . . and the cold out!!


Here it is all done.


I finished them on Christmas Eve . . . they were all wrapped and ready for Babby to open on Christmas morning.  


(Of course she loved them . . . just like I
told you she would!)


Here it is turned inside out so you can see all the fleece. Don't you want to just wiggle your fingers in it?

(If I added some googly eyes it could probably pass as a Muppet!!)


I think I'll make the next pair royal blue with white fleece. 

How about you?? Did you start your pair yet?

Until next time, keep your nose in a book or your fingers in fiber.


Tuesday, December 23, 2014

Mittens . . . Step #3

I made a few mitten decisions. I decided that since I have some bags of fleece that have been in my stash for an indeterminable length of time. . .  (that's code for: I've had it so long I don't remember where or when I got it) . . . that I would use some of it to line my mittens. Since my mitten is bright purple and the fleece is emerald green, I also decided I would give the mittens to my mother.
Here she is fresh out of nursing
 school! Do you remember the days

 when nurses looked like this?!


Why my mother? 

Well, Babby . . . (that's code name for: my nephew's strange pronunciation of grandma) . . . was a nurse for about 37 years. She started back in the day when nurses wore white caps, white uniforms, white nylons and white shoes. Needless to say, when she retired she became a fan of color. 

Babby also walks a lot, she's always cold and since she's a knitter she'll know the work that went into them . . . she'll also like them since her 'baby girl' made them for her. (I of course would be her 'baby girl').


On to the fleece . . . 


Here it is. Fresh out of the bag that it's been sitting in for-who-knows-how-long. It's really compacted and needs to be gently loosened.  (It's also really, really green. Really, really bright green.) 

But . . . if you wore white for 37 years . . . 


I just gently pulled on it to loosen it up and spread it out. 

This is only a small portion of the clump . . . here's what it looks like once it's been loosened.

Next I'll gently take a smaller clump and work it into a strip that is about a half inch wide and about 5-6 inches long.


Have you picked up on the gently? You want to keep the fibers intact so they keep their length. So . . . no scissors!!


Here's what they look like. 

One row of knitting will need about 10 or 12 strips, so get a few ready.


Go ahead. Get some fleece. 

If you don't have some hiding in your yarn stash . . .  and if you don't have any sheep in your back yard . . . you might have to visit a yarn store. . . or go on-line. If you go on-line, Google 'fleece for spinning'. If you just Google 'fleece for mittens', you'll get fleece material.

Stay tuned for Mittens . . . Step #4. I'll show you how to knit the fleece in.

Until next time, keep your nose in a book or your fingers in fiber.


Saturday, December 20, 2014

Mittens . . . Step #2


Here is the cuff of my mitten . . . just as I promised!

I must confess, I'm not sure the mock cable pattern is worth it. I think it would have been just as easy to actually work a cable. (Or to just work the traditional K1P1 or K2P2 ribbing).


To work the mock cable, you go into the third stitch on the needle and knit it . . . but don't slide it off.


Keeping the stitch on the needle, you then knit the first stitch and slide it off, and then knit the second stitch and slide it off . . . along with the third.

It's easy enough to do mentally, but physically . . . I gotta tell you, I can feel my bamboo needles bending a little from the tension.

I think next time I'll save my fingers and just work a cable.

Or maybe a mock cable but over two stitches, not three.


Next I will start the body of my mitten . . . but first I have to decide if I want to line them with fleece. I'll let you know.

Until next time, keep your nose in a book or your fingers in fiber.

Thursday, December 18, 2014

Mittens . . . Step #1


Okay, are you ready to knit some mittens? 


I've started mine. I'm using worsted weight Brown Sheep yarn and knitting them in the round . . . then I won't have to sew up any seams! (I prefer to think of it as being expedient as opposed to lazy.)


The pattern I'm using calls for 45 stitches. 
Whenever I knit in the round I cast on an extra stitch, so here are my 46 stitches. All divided onto three double pointed needles waiting for me to knit away. (If only I didn't have to work . . . or Christmas shop).


I slipped the first stitch from the needle
on the right, onto the needle on the left.


Well, are you wondering why I cast on an extra stitch??

Take the last stitch that was cast on and slip it onto the needle holding the first stitch that was cast on. Then  knit the two stitches together when you work the first row.

It makes the join a little tighter and a little neater.


Another method to help tighten the join, is to do this same switch . . . and then also take the first stitch cast on and slip it to the needle where the last stitches were cast on. In other words, the placement of the first and last cast on stitches are reversed. In this method you would knit each stitch separately, and therefore you would only cast on the number called for in the pattern.

What method do you use when you join your round?

I'm going to start my cuff tonight. Instead of a traditional ribbing I'm going to work a mock cable pattern. I'll do a few rows and show you.

In the meantime, pick out your yarn and go ahead, cast on. 

Until next time, keep your nose in a book or your fingers in fiber.

Tuesday, December 16, 2014

Monday Night Knitting Group

Another fabulous night of knitting! (Not to mention coffee and cookies too!)


Janet is making a scarf out of Noro yarn.


(I think she already has an outfit planned to wear it with!!)


Joan finished a hat for her mom . . . lucky you Mrs. M!!


Martha is making a scarf for a gift . . . it doesn't show in the picture but the yarn has a red metallic thread in it. 

Shiny yarn!! I don't think it can get any better than that!!


Mary is also making a scarf . . . but look closely . . . hers is reversible! How cool is that?! 

I might have to copy her and make one after the holidays.


Pat can always be counted on to inspire us with a different handcraft. She is making a quilt . . . with little tiny stitches.


I think it's going to be an heirloom. No doubt.


Peggy is a little too organized. Believe it or not, this is the ornament she is going to make for NEXT year!

How cute though?! A light-bulb, a couple of Sharpies, some scrap yarn and you have the cutest little ornament.

Watch for light-bulbs to go on sale!


I bet Lizzy will have her sweater done for next month, and Joy will have her scarf finished.


Monday Night Knitting . . . always a good time. But if you are knitting . . . and knitting with wonderful people . . . and then doing it in a library . . . well, how can you not have a good time?

Happy Holidays and Peace to you and yours.

Until next time, keep your nose in a book or your fingers in fiber.


Wednesday, December 10, 2014

Cold Hands, Warm Heart . . . or Time For Mittens?

As soon as the weather turns chilly . . . out come my driving gloves. I keep them in my pocketbook so that I never-leave-home-without-them. Unless of course I leave one at a restaurant, or the counter at the butchers . . . both of which have happened. Although they keep my fingers from touching the cold steering wheel in my car, and they look nice . . . let's face it . . . they don't keep your hands toasty warm.

For toasty warm, you need mittens. Doesn't just thinking about mittens warm you up? Maybe it's the nostalgia from my childhood. I can remember playing outside in the snow until my mittens (hand-knit by my mother of course), were soaking wet and had little tiny snowballs stuck to them. Then it was time to come in and put the mittens on the radiator to dry. (I'm sure that's a fire code violation now!!) 

Or maybe it's remembering the days when my kids were little and in snowsuits. Their mittens were always attached to each other with a ribbon long enough to go through the arms of their jackets. Then when they off, they couldn't get left behind.


So what do you think? Shouldn't we knit some mittens? We don't have to do complicated Norwegian ones . . . although they are awfully pretty. We can start with just a basic mitten. We'll knit them with wool . . . and with love.


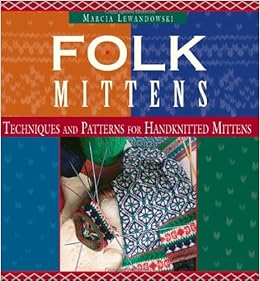
Check out Marcia Lewandowski's Folk Mittens.  It's a great book with techniques for different types of thumbs, cuffs and decreases. There's patterns for two-color mittens, mittens with a glove inside and yes . . . the plain mitten from your childhood.


click here to place a hold


Go ahead. Check it out. Knit some mittens. You'll create a little warmth in your heart. I bet when you wear them, you'll feel like a kid again.


Until next time, keep your nose in a book or your fingers in fiber.

Friday, November 28, 2014

Can You Take a Little Ribbing?

I was recently asked by someone, "Why is my ribbing weird?".  When I looked at her knitting . . . well, sure enough, she had 'gutter issues'.  


See how only the first knit stitch to the right
of the purl stitches is distorted? 

Uneven ribbing can be a problem for some knitters since many people purl looser than they knit. The extra yarn that is used in the purl stitch relaxes, or slides back into the stitch before it. When it is a knit stitch . . . well, it appears bigger, looser, wonkier . . . any of these adjectives can be applied!

The knit stitches on the left hand side of purl stitches won't loose their shape since any extra yarn will relax into the stitch before it, not the stitch after it.


It's also common for this to happen with cables. In order for the cables to really stand out, most patterns have purl stitches on either side of them . . . the same thing happens . . . the purl stitch relaxes into the left-hand side of the cable.


There are many opinions on how to fix this . . . here's two of what I think are the easiest. (You did want MY opinion . . . didn't you??)


If you pull the yarn tighter there will not be
any 'extra' to slide back into the knit stitch
before it.


The easiest way is to try and work the purl stitch tighter. Bring the working yarn as far forward as you can. (Pull it until the 'purl bump' from the back is visible in the front), then keeping the tension tight, go ahead and purl the stitch. Then purl the rest of your stitches as you would normally.

Try a few rows. Sometimes that is enough to solve the problem.


Since the yarn is going under the needle, it will
use a 'smidge' less . . . that means less to go
back into the knit stitch before it.


If that doesn't solve the problem, try working the first purl stitch backwards. 

Instead of wrapping the yarn around the needle counter-clockwise, wrap it around clock-wise. (The yarn will go under the right needle.)

The stitch will be twisted. . . but don't worry . . .we'll fix it on the next row.


The stitch is twisted since the
'mount' is in the back.


When you come to that stitch on the next row, it will be twisted.

Just knit it through the back loop.


See??!! 

Look how much better those knit stitches look! 

If you have trouble with your ribbing, or with your cables . . . give either trick a try.

Hopefully it will help your tension.

Well, your knitting tension. 
If you have other kinds of tension, I would recommend a glass of Pinot Noir.


Until next time, keep your nose in a book or your fingers in fiber.


Thursday, November 13, 2014

A Rookie's Hand Painted Yarn

Well I did as I said . . . and now my yarn stash is all neat and organized. It is all arranged by color and tucked away in plastic bins with a cedar block inside. (My mother told me I HAD to use cedar blocks . . . and as I tell my kids, "Always listen to your mother." So I used the cedar blocks!).

While I was doing my little organizational project, I found a little surprise. My mother had given me a kit to dye two skeins of yarn. . . please don't ask me when she gave it to me!! So I suddenly had a project for the afternoon! I quickly put the plastic bins away (good thing I had finished organizing!) and set off to the kitchen.


Here is the result. I will confess it looked much nicer when it was wet. I hung it outside to dry and when I went to bring it in, I looked at it and chuckled. All I could think of were the many yarn labels and pattern directions that state "work from two skeins when using hand painted yarn." 

It's kind of obvious why, isn't it? Just a few extra seconds in the dye, or a little extra swishing around and one skein is darker in some areas than the other.

That's okay. I think I will make a scarf with it. I'll work the two skeins together and hopefully it will blend beautifully and no one will ever know what a beginner dyer I am. 
I'll show it to you as I go.

Until next time, keep your nose in a book or your fingers in fiber.

Friday, November 7, 2014

I Think I've Reached 'Shut-Off'.

Much as I love working in the library, much as I am fortunate enough to work with REALLY great co-workers, much as I enjoy banter with the patrons, much as I love talking about books . . . well, actually just talking . . . I must admit that I also love it when it is time for a few vacation days!

So here I am with 5 days off. A couple of the days will be me completely alone in the house. So what do I have planned? Well, what else? Yarn organization! I plan to pull everything out from my eaves . . . plastic bins, bags, boxes . . . every skein, hank and scrap. 

Then what? Do I arrange it by color? By weight? By project? It's a dilemma. I'm not even sure how I ended up with this much yarn. I feel like the guy in the movies that goes up to the bar and is told, "sorry bud, you're done". 

I think I need to stay out of the yarn stores and knit from stash. 

Until next time, keep your nose in a book or your fingers in fiber.

Saturday, October 25, 2014

That Which is Old is New Again

It must be old . . . when was the
 last time you paid $1.00 for
an entire pattern book?! 
One of my Monday Night 'knitting ladies' recently brought in some patterns she no longer wanted for me and the other knitters in the group to go through. (thanks Mary!). Tucked in the pile I found what I can only think of as gems. Two pattern books that have to be from the 1950's. At first I looked through them and smiled. I chuckled at the hair styles and the outfits. Then I thought of the items that were probably knit from these pages. . . cardigans for a husband, socks for a soldier, booties for an expected baby . . .


As my mind created all kinds of scenarios I started to look closer at the photos.

Hey wait a minute . . . I think I like that gray one . . . if I made it to be worn oversized and added to the length . . .

I mean really . . . it's cables.
Cables never go out of style. Right?


I think I may be too lazy to knit gloves . . . but I love mittens!! Look at these . . . cables again! Wouldn't they be great in alpaca?


Could it be true that the old comes back into style? 


Here's something that never goes out of style. Can you see it on the bottom of the left hand page? Squint and look close. "Be sure your stitch gauge is correct."
See, it is true! Some things just never go out of style!


Until next time, keep your nose in a book or your fingers in fiber.


Tuesday, October 21, 2014

Monday Night Knitting Group

I came home from 'Knitting Night' last night and could not wait to sit down and break out my needles. The night seemed to just fly by . . . there were quick lessons on how to pick up stitches under the arm for a sleeve, how to seam, pattern reading and more! 

But the projects always inspire me.

Take a look .  .  .


Joy finished her cable scarf and has started another scarf for a friend that 'loves purple'.
(I think she'll love this!!)


Katherine is working on a cardigan in this beautiful shade of green.


Linda is making this shawl out of Noro. (You can spot Noro yarn at a glance, can't you?)

I think this would look great over a winter coat on a dreary gray day.


Lizzie was nervous about running out of yarn so she is doing the sleeves in a different shade of purple. She'll tie in the original color at the cuffs. 

I love it!!


Andrea joined us and is making a cowl out of alpaca yarn that is so soft you want to grab it and rub it against your cheek. (I didn't . . . but I did keep touching it!)


Nancy's grandson is going to love this!!


It was a night of Christmas stockings. Peggy finished her two . . .


and Audrey finished hers!


Martha is making a scarf from yarn she spun herself!! So SOFT!


(It would look great with my coat, but she didn't seem to want to relinquish it.) 


Janet is wearing a sweater she finished and she is working on a baby blanket. 


Aren't they inspiring?!


They are all shy though . . . they made me look like a bad photographer. Did you notice the heads are all chopped off?


Until next time, keep your nose in a book or your fingers in fiber.