
So I got out my trusty Vogue Knitting (my go-to-reference-book), and started looking at some options. I settled on 'the crochet cast on for knit one, purl one rib'.

It seemed easy enough.
Start by crocheting a length of chain with waste yarn.
Here's a hint - it's easier at the end if you use cotton waste yarn.
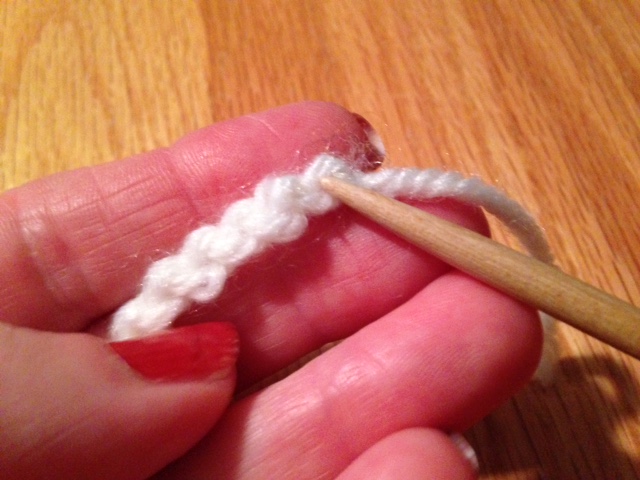
You'll use the back of the chain to pick up stitches.
Using your needle and the yarn for your project, pick up two stitches in the first two bumps on the chain.

Then skip a bump and pick up a stitch in the next one.

Keep going, picking up a stitch in every other bump on the chain.
When you're done, it will look like this. The length of chain will look a little wonky . . . but that's okay . . . you're going to get rid of it in a bit.

Next purl one row.

Then knit one row.
Easy enough so far, right?

Here's where it gets a little tricky.
With the purl side facing you, insert your other needle into the first stitch purlwise.
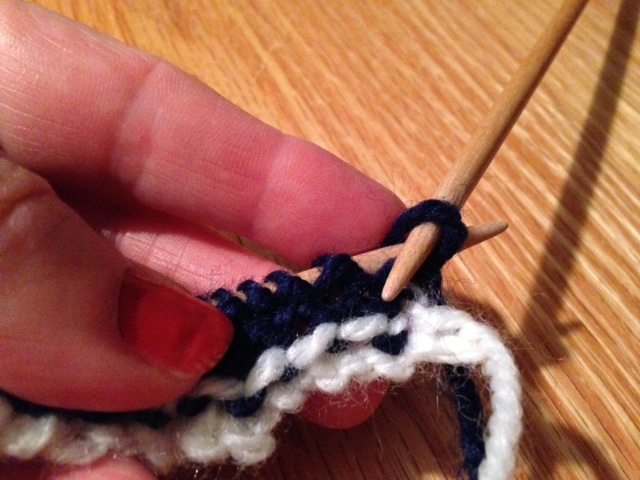
Then go down and pick up the loop from the first stitch you picked up from the chain. Purl the two together.
That's what the directions said to do. Go ahead and try it. I did and I found it as close to impossible as you can get!

So instead, with the yarn in the front, I slipped the first stitch purlwise . . . then I picked up the loop with the right needle . . . then I slipped them both back to the left needle . . .

and then I purled the two stitches together. Much easier and less stress involved.
Sorry for the blurry photo . . . I wasn't even drinking wine.
Move the yarn to the back and knit the next stitch on the left needle.
Repeat the last two steps across the row . . . (it suddenly became clear why the directions had me pick up in every other chain bump since you are only going to lift the loop when you purl a stitch . . .).
Work as many rows of K1P1 rib as you need.


You'll end up with something that looks like this.
Now comes the fun part.
Take the tip of your needle and gently take out the knot and undo the chain stitches.
(I didn't follow my advice at the beginning so some of my little white fibers wanted to split or stick to some of my little navy blue fibers. So make it easy on yourself and use cotton waste!)
When I started to remove the chain I was a little nervous. I had only used waste yarn and chain cast-ons in the past for a provisional cast-on . . . I was so sure I was going to have live stitches at the bottom.
But look at it . . . it was kind of like a little magic . . . it leaves a nice rounded edge that is also stretchable . . . perfect for a sleeve or waistband!!
I realized now that using navy blue yarn wasn't the best choice. It's too dark for you to really see the nice edge. I was going to re-knit it in a lighter color so you could see . . . but then I thought you should do it . . . then you can try it and see for yourself! Go ahead . . . give it a whirl . . . learn something new.
Until next time, keep your nose in a book or your fingers in fiber.
No comments:
Post a Comment